OWASP ZAP Tutorial - Part 1: Intercepting Traffic

OK, OK, OK, just take a chill pill there my friend. Although ZAP is a little different from Burp, I think you will find that it is just as useful, and in some cases perhaps more so. Let's jump in with a little exercise that will help you figure out the basics of this often overlooked gem.
Before going any further, I am going to take a moment to warn you about testing web applications without permission; don't do it. Testing a site that is not yours is what a friend of mine has referred to as a "non-extradition country career choice" (thanks Adrien de Beupre). Equador is a lovely country, but you probably don't want to live there.
Manually Intercepting HTTP Requests and Reponses
- Open up OWASP Zap and then open your web browser of choice. Make sure that you have your browser's proxy settings enabled to use ZAP. If you have not done this yet, go here for more information. Additionally, you may want to consider using a proxy switcher like Foxy Proxy or SwitchyOmega if you aren't already doing so. If you have two monitors, I highly recommend placing ZAP in one screen and the browser in the other.
- Once you have your browser configured to pass through ZAP, browse to the web application that you want to test. You will notice that the ZAP target screen quickly populates with lots of sites. You will also notice that if you have several tabs opened, they will all be represented here. Don't have lots of tabs open.

- Even with just one tab open, you can end up with lots of noise. Let's add our target site to a context and include it in our scope (the site we have permission to test). Scope is a pivotal concept, unless you are into impromptu relocations to Equador.
To do this, find the site URL in the pane on the left and right-click it. Choose New Context. In the New Context window that appears, select the URL so that you can edit the context name; give it a name relevant to the site you are testing (Client A, Ajax Compant, etc.). Make sure that the In Scope check box is ticked and then click OK.

- Now that you have created a context and made it "in scope," it is time to hide the non-relevant noise in the targets tab. To do this, click on the little target icon in the top left corner of the Targets window.

- Great, now we have a more manageable screen. At this point, it is time to set a break. Zap uses terminology often found in reverse engineering tools like Ida. Rather than simply giving you a proxy interface like Burp does, Ida requires you to actually perform the task that you want to test so that it can record the behavior. For example, using an HTML login form to submit credentials. Try this now.
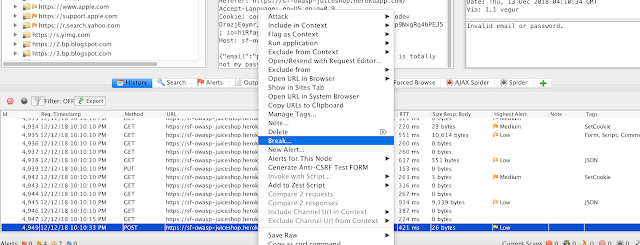
- Once you have performed the task, find the activity in the history pane (by default, at the bottom). Be sure that you have the History display option active and not something like Web Sockets, or your view will look weird. Also, you will want to click the little target to reduce the history results to those that are in scope (remember steps 3 & 4). Right-click that item and choose the Break option.
- In the window that appears, just go with the default options. You can also perform some regex tests in this screen that will allow you intercept only requests that meet specific criteria, but that is beyond the scope of this post. Click Save to set the break point.

- Once the Break point has been set, return to your browser and perform the same action (whatever you did in step 5). You will notice that the action does not complete in the browser. If you look at ZAP you will see that there is a new tab in the Request/Response window called Break and it is open. In this screen, you can modify the request parameters and pass them along to the server. To modify the parameters, just click inside the box and change the text. Try it.

- To forward the request along, click the button labeled Submit and Step to the Next Request or Response in the toolbar above. ZAP should then intercept the server's response. Examine the response and see what happened. Did your change cause the server to return any unexpected errors?
Click the button again to forward the response to the browser and then see how it renders there.
- If you are done testing and you want to clear the break point, simply choose the Break Points view in the pane at the bottom of the screen, right-click the break point that you want to remove, and then choose Remove.


Comments
Post a Comment