Getting Started with Burp - Part 2: The Target and Spider Tabs
This is the second post in Burp tutorial, and in it I will discuss the Target and Spider tabs and their functions. I will also give you a short exercise that will help you understand some of these functions.
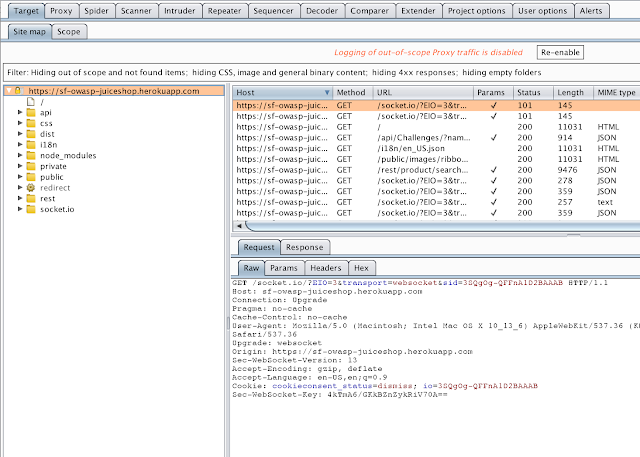
The Target tab is the default interface when Burp starts and it has two sub-tabs: Site Map and Scope. The Site Map tab displays sites that have been proxied by Burp and it details the identified structure of those sites. This tab is broken into three different panes: the site map window (left side), the connection history window (top right), and the request/response pane (bottom right).
The second sub-tab in Target is the Scope tab, and it allows the user to add and remove URLs from the scope. Setting changes made in this interface affect the rest of the application. When working in Burp, one of the first things you should do is set the scope of your test. This will help prevent you from testing applications which you do not have permission to test.
Setting the Scope and Filtering
The crawl options can be configured under the Spider tab, but for the purposes of this tutorial we will simply use the defaults. I strongly recommend that you take the time to learn about various techniques when crawling a website. In the future, I will put out a post regarding this topic. In the meantime, Portswigger has an awesome article about this at https://portswigger.net/burp/documentation/scanner/crawling.
Crawling a Site with Spider
The Target tab is the default interface when Burp starts and it has two sub-tabs: Site Map and Scope. The Site Map tab displays sites that have been proxied by Burp and it details the identified structure of those sites. This tab is broken into three different panes: the site map window (left side), the connection history window (top right), and the request/response pane (bottom right).
The second sub-tab in Target is the Scope tab, and it allows the user to add and remove URLs from the scope. Setting changes made in this interface affect the rest of the application. When working in Burp, one of the first things you should do is set the scope of your test. This will help prevent you from testing applications which you do not have permission to test.
Setting the Scope and Filtering
- Open Burp and your web browser. Make sure that you have Burp selected in your proxy switcher plugin (e.g. Foxy Proxy). Click the Proxy tab in Burp and make sure that Intercept is Off. We will talk more about the Proxy tab in a different post, but for now we need to make sure it is disabled.
- Browse to https://sf-owasp-juiceshop.herokuapp.com. It runs on the free tier Heroku service, so it takes a minute for the site to "wake up." Be patient. When the site renders in the browser, move to the next step. If the site says "page cannot be displayed," check your settings from step 1.
- In the Target tab, under the Site Map sub-tab, find the URL https://sf-owasp-juiceshop.herokuapp.com in the site map window and right-click it. In the window that appears, click Add to Scope. This will reduce the number of results displayed in the window.
Hint: another way to help reduce the noise is to limit the open browser tabs to those sites that you are testing.
- Once you have set the scope, click the Filter bar that is located just above the display panes. In the filter options window, check the box labeled Show only in-scope items. This will hide those sites that are not in scope from view. There is no OK button on this screen, so in order to save the change, simply click somewhere outside of the options window.


Now that you have set the scope of the site and you have filtered out the noise, let's crawl (i.e. spider) the site so that we can see what is available in it. When you are testing a site, this should be the first step that you take. Burp uses a function called Spider to crawl websites. It does this by automatically following every HREF and URI that it finds in the site's source code. From there, Burp builds a graphical hierarchy of the site's structure under the site map pane. To see the structure of the site, click the triangle icon located to the left of the URL. In the image below, you can see that Burp was able to identify some of structure of the site simply by loading the page.

The crawl options can be configured under the Spider tab, but for the purposes of this tutorial we will simply use the defaults. I strongly recommend that you take the time to learn about various techniques when crawling a website. In the future, I will put out a post regarding this topic. In the meantime, Portswigger has an awesome article about this at https://portswigger.net/burp/documentation/scanner/crawling.
Crawling a Site with Spider
- In the site map pane, right click on the URL https://sf-owasp-juiceshop.herokuapp.com and choose Spider this Host. Note that the lettering on the Spider tab has changed to red, which indicates that Spider is running. You can click on the Spider tab to view the progress. You can also watch the site map pane and notice that some new items have been added.

- Depending on the website, a crawl can complete very quickly or it can drag on for a considerable amount of time. Let the crawl run for a few minutes and then pause it opening the Spider tab and click the button labeled Spider is Running. This will pause the crawl.

- In the Target tab, look at the structure of the site. Was anything new found? If so, is it interesting?


Comments
Post a Comment